
Example
Product Photography Background Removal Example
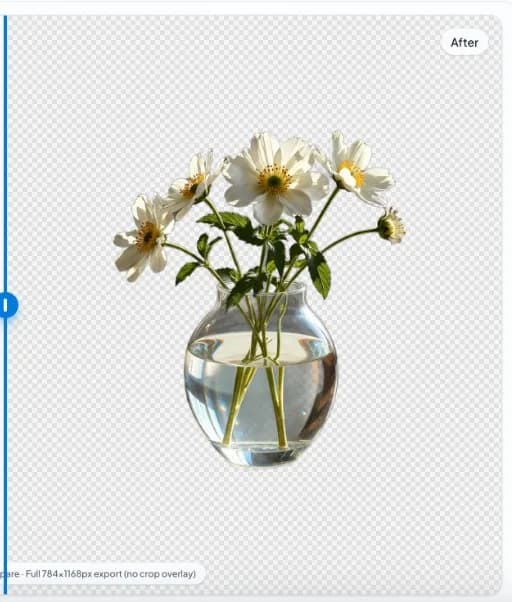
Glass vase and flowers with strong light—product still life from nobg.eu.
In short
- Challenge: glass, water, and highlights.
- Expectation: believable alpha on reflective surfaces.
- Product Photography: verify backdrop contrast before trusting a single-pass mask.
- Product Photography: keep originals; never overwrite masters with social recompressions.
- Product Photography: preview cutouts on white and dark UI plates prior to upload.
- Product Photography: document crop padding so series look consistent in grids.
- Product Photography: if interiors (handles/mesh) vanish, re-check mask holes at 200% zoom.
- Product Photography: preferred export is PNG/WebP with alpha for remix workflows.
Before

After
Product Photography section 1: practical detail
For Product Photography workflows on nobg.eu, treat background removal as a controlled production step rather than a one-click gamble. Example guidance 1 for Product Photography focuses on capture, mask QA, and export discipline shown in the before/after pair. Start from a source file that already separates the subject from the backdrop in luminance and color; local segmentation amplifies good capture decisions and cannot invent missing edge data. Open the asset in the browser editor, run on-device inference, then inspect the mask at 100–200% zoom along high-risk edges before you export. Use the on-page media as a visual reference, then repeat the checklist on your own files before publishing. Prefer transparent PNG or WebP masters when downstream systems support alpha, and flatten to a channel-required solid fill only after QA. Document filename patterns, padding conventions, and review checklists so teammates repeat the same quality bar without re-uploading assets to an external cutout API for every draft. When edges fail, fix lighting or reshoot rather than endlessly masking a compromised source—this is usually faster for Product Photography catalogs and keeps privacy intact because pixels for the core edit stay in the browser session.
Product Photography section 2: practical detail
For Product Photography workflows on nobg.eu, treat background removal as a controlled production step rather than a one-click gamble. Example guidance 2 for Product Photography focuses on capture, mask QA, and export discipline shown in the before/after pair. Start from a source file that already separates the subject from the backdrop in luminance and color; local segmentation amplifies good capture decisions and cannot invent missing edge data. Open the asset in the browser editor, run on-device inference, then inspect the mask at 100–200% zoom along high-risk edges before you export. Use the on-page media as a visual reference, then repeat the checklist on your own files before publishing. Prefer transparent PNG or WebP masters when downstream systems support alpha, and flatten to a channel-required solid fill only after QA. Document filename patterns, padding conventions, and review checklists so teammates repeat the same quality bar without re-uploading assets to an external cutout API for every draft. When edges fail, fix lighting or reshoot rather than endlessly masking a compromised source—this is usually faster for Product Photography catalogs and keeps privacy intact because pixels for the core edit stay in the browser session.
Product Photography section 3: practical detail
For Product Photography workflows on nobg.eu, treat background removal as a controlled production step rather than a one-click gamble. Example guidance 3 for Product Photography focuses on capture, mask QA, and export discipline shown in the before/after pair. Start from a source file that already separates the subject from the backdrop in luminance and color; local segmentation amplifies good capture decisions and cannot invent missing edge data. Open the asset in the browser editor, run on-device inference, then inspect the mask at 100–200% zoom along high-risk edges before you export. Use the on-page media as a visual reference, then repeat the checklist on your own files before publishing. Prefer transparent PNG or WebP masters when downstream systems support alpha, and flatten to a channel-required solid fill only after QA. Document filename patterns, padding conventions, and review checklists so teammates repeat the same quality bar without re-uploading assets to an external cutout API for every draft. When edges fail, fix lighting or reshoot rather than endlessly masking a compromised source—this is usually faster for Product Photography catalogs and keeps privacy intact because pixels for the core edit stay in the browser session.
Product Photography section 4: practical detail
For Product Photography workflows on nobg.eu, treat background removal as a controlled production step rather than a one-click gamble. Example guidance 4 for Product Photography focuses on capture, mask QA, and export discipline shown in the before/after pair. Start from a source file that already separates the subject from the backdrop in luminance and color; local segmentation amplifies good capture decisions and cannot invent missing edge data. Open the asset in the browser editor, run on-device inference, then inspect the mask at 100–200% zoom along high-risk edges before you export. Use the on-page media as a visual reference, then repeat the checklist on your own files before publishing. Prefer transparent PNG or WebP masters when downstream systems support alpha, and flatten to a channel-required solid fill only after QA. Document filename patterns, padding conventions, and review checklists so teammates repeat the same quality bar without re-uploading assets to an external cutout API for every draft. When edges fail, fix lighting or reshoot rather than endlessly masking a compromised source—this is usually faster for Product Photography catalogs and keeps privacy intact because pixels for the core edit stay in the browser session.
Product Photography section 5: practical detail
For Product Photography workflows on nobg.eu, treat background removal as a controlled production step rather than a one-click gamble. Example guidance 5 for Product Photography focuses on capture, mask QA, and export discipline shown in the before/after pair. Start from a source file that already separates the subject from the backdrop in luminance and color; local segmentation amplifies good capture decisions and cannot invent missing edge data. Open the asset in the browser editor, run on-device inference, then inspect the mask at 100–200% zoom along high-risk edges before you export. Use the on-page media as a visual reference, then repeat the checklist on your own files before publishing. Prefer transparent PNG or WebP masters when downstream systems support alpha, and flatten to a channel-required solid fill only after QA. Document filename patterns, padding conventions, and review checklists so teammates repeat the same quality bar without re-uploading assets to an external cutout API for every draft. When edges fail, fix lighting or reshoot rather than endlessly masking a compromised source—this is usually faster for Product Photography catalogs and keeps privacy intact because pixels for the core edit stay in the browser session.
Specular highlights
Angle product to move hot spots off edges.
Label legibility
Preserve text sharpness; do not over-smooth mask.
Expanded Product Photography detail 1
For Product Photography workflows on nobg.eu, treat background removal as a controlled production step rather than a one-click gamble. Expanded merge content 1 for Product Photography. Start from a source file that already separates the subject from the backdrop in luminance and color; local segmentation amplifies good capture decisions and cannot invent missing edge data. Open the asset in the browser editor, run on-device inference, then inspect the mask at 100–200% zoom along high-risk edges before you export. Append-only depth for AdSense-quality pages. Prefer transparent PNG or WebP masters when downstream systems support alpha, and flatten to a channel-required solid fill only after QA. Document filename patterns, padding conventions, and review checklists so teammates repeat the same quality bar without re-uploading assets to an external cutout API for every draft. When edges fail, fix lighting or reshoot rather than endlessly masking a compromised source—this is usually faster for Product Photography catalogs and keeps privacy intact because pixels for the core edit stay in the browser session.
Expanded Product Photography detail 2
For Product Photography workflows on nobg.eu, treat background removal as a controlled production step rather than a one-click gamble. Expanded merge content 2 for Product Photography. Start from a source file that already separates the subject from the backdrop in luminance and color; local segmentation amplifies good capture decisions and cannot invent missing edge data. Open the asset in the browser editor, run on-device inference, then inspect the mask at 100–200% zoom along high-risk edges before you export. Append-only depth for AdSense-quality pages. Prefer transparent PNG or WebP masters when downstream systems support alpha, and flatten to a channel-required solid fill only after QA. Document filename patterns, padding conventions, and review checklists so teammates repeat the same quality bar without re-uploading assets to an external cutout API for every draft. When edges fail, fix lighting or reshoot rather than endlessly masking a compromised source—this is usually faster for Product Photography catalogs and keeps privacy intact because pixels for the core edit stay in the browser session.
Expanded Product Photography detail 3
For Product Photography workflows on nobg.eu, treat background removal as a controlled production step rather than a one-click gamble. Expanded merge content 3 for Product Photography. Start from a source file that already separates the subject from the backdrop in luminance and color; local segmentation amplifies good capture decisions and cannot invent missing edge data. Open the asset in the browser editor, run on-device inference, then inspect the mask at 100–200% zoom along high-risk edges before you export. Append-only depth for AdSense-quality pages. Prefer transparent PNG or WebP masters when downstream systems support alpha, and flatten to a channel-required solid fill only after QA. Document filename patterns, padding conventions, and review checklists so teammates repeat the same quality bar without re-uploading assets to an external cutout API for every draft. When edges fail, fix lighting or reshoot rather than endlessly masking a compromised source—this is usually faster for Product Photography catalogs and keeps privacy intact because pixels for the core edit stay in the browser session.
Expanded Product Photography detail 4
For Product Photography workflows on nobg.eu, treat background removal as a controlled production step rather than a one-click gamble. Expanded merge content 4 for Product Photography. Start from a source file that already separates the subject from the backdrop in luminance and color; local segmentation amplifies good capture decisions and cannot invent missing edge data. Open the asset in the browser editor, run on-device inference, then inspect the mask at 100–200% zoom along high-risk edges before you export. Append-only depth for AdSense-quality pages. Prefer transparent PNG or WebP masters when downstream systems support alpha, and flatten to a channel-required solid fill only after QA. Document filename patterns, padding conventions, and review checklists so teammates repeat the same quality bar without re-uploading assets to an external cutout API for every draft. When edges fail, fix lighting or reshoot rather than endlessly masking a compromised source—this is usually faster for Product Photography catalogs and keeps privacy intact because pixels for the core edit stay in the browser session.
Expanded Product Photography detail 5
For Product Photography workflows on nobg.eu, treat background removal as a controlled production step rather than a one-click gamble. Expanded merge content 5 for Product Photography. Start from a source file that already separates the subject from the backdrop in luminance and color; local segmentation amplifies good capture decisions and cannot invent missing edge data. Open the asset in the browser editor, run on-device inference, then inspect the mask at 100–200% zoom along high-risk edges before you export. Append-only depth for AdSense-quality pages. Prefer transparent PNG or WebP masters when downstream systems support alpha, and flatten to a channel-required solid fill only after QA. Document filename patterns, padding conventions, and review checklists so teammates repeat the same quality bar without re-uploading assets to an external cutout API for every draft. When edges fail, fix lighting or reshoot rather than endlessly masking a compromised source—this is usually faster for Product Photography catalogs and keeps privacy intact because pixels for the core edit stay in the browser session.
FAQ
FAQ 1 for Product Photography?
For Product Photography, keep inference local, zoom-check edges (focus 1), and export transparent masters before flattening for any channel that forbids alpha.
FAQ 2 for Product Photography?
For Product Photography, keep inference local, zoom-check edges (focus 2), and export transparent masters before flattening for any channel that forbids alpha.
FAQ 3 for Product Photography?
For Product Photography, keep inference local, zoom-check edges (focus 3), and export transparent masters before flattening for any channel that forbids alpha.
FAQ 4 for Product Photography?
For Product Photography, keep inference local, zoom-check edges (focus 4), and export transparent masters before flattening for any channel that forbids alpha.
FAQ 5 for Product Photography?
For Product Photography, keep inference local, zoom-check edges (focus 5), and export transparent masters before flattening for any channel that forbids alpha.
White on white?
Reshoot with separation—not software alone.
Transparent packaging?
See transparent objects example.
How should I prepare source images for Product Photography?
Shoot or select files for Product Photography with clear subject/backdrop separation, even lighting, and enough resolution for your final export. Soft shadows glued to the silhouette are harder to salvage than sparse backgrounds.
Does nobg.eu upload Product Photography assets for the core cutout?
No. Segmentation for the core edit runs locally in your browser session. Site analytics or optional ads are separate from the cutout pipeline—see the Privacy Policy.
Which export format fits Product Photography delivery?
Use transparent PNG or WebP when your destination supports alpha. Flatten to solid white or brand color only when a marketplace or print pipeline requires it, after edge QA on the Product Photography asset.
What usually breaks Product Photography masks?
Low contrast edges, heavy JPEG blocking, motion blur, and backdrops matching subject luminance. Fix capture first; then re-run local segmentation on a cleaner source.
How do I QA a finished Product Photography cutout?
Preview on white, dark, and brand-colored plates. Zoom into labels, hairlines, glass, and interior holes. Reject exports with halos or chewed corners before publishing.
Related pages
Related: Guides, Related solutions, About.